Asp.Net

Difference between WCF and Web API
What is WCF? WCF stands for Windows Communication Foundation. It is used to create a distributed and...
Testing is an essential aspect of any programming language. Testing for ASP.Net applications is possible with the help of Visual Studio.
Visual Studio is used to create test code. It is also used to run the test code for an ASP.Net application. In this way, it becomes simple to check for any errors in an ASP.Net application. In Visual Studio, the testing module comes with an out of box functionality. One can straightaway perform a test for an ASP.Net project.
In this tutorial, you will learn-
The first level of testing an ASP.Net project is unit level testing. This test is the functionality of an application. The testing is conducted to ensure that the application behaves as expected. In ASP.Net, the first task is to create a test project in Visual Studio. The test project will contain the necessary code to test the application.
Let's consider the below web page. In the page, we have the message "gtupapers – ASP.Net" displayed. Now how can we confirm that the correct message is displayed when an ASP.Net project runs. This is done by adding a test project to the ASP.Net solution (used to develop web-based applications). This test project would ensure that the right message is displayed to the user.

Let's look into more detail now and see how we can work on testing in ASP.Net.
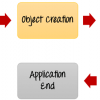
Before we create a test project, we need to perform the below high-level steps.
So let's follow the above high-level steps and see how to implement testing.
Step 1) Ensure the DemoApplication is open in Visual Studio.
Step 2) Let's now add a new class to the DemoApplication. This class will contain a string called 'gtupapers – ASP.Net.' This string will be tested in our testing project.
Follow below step to add a new class.

Step 3) In this step,

Now, a new class is added to file "DemoApplication."
Step 4) Open the new Tutorial.cs file from "DemoApplication". Add the string "gtupapers – ASP.Net."
To open the file, double-click on the Tutorial.cs file in the Solution Explorer.

The file will have some default code already written. Do not bother about that code, just add the below line of code.

namespace DemoApplication
{

  public class Tutorial
  {
     public String Name;
	  public Tutorial()
	  {
	     Name = "gtupapers - ASP.Net";
	  }
  }
}
Code Explanation:-
Step 5) Now go to the demo.aspx file and add the lines of code to display the text "gtupapers – ASP.Net."

<!DOCTYPE html>
<html xmlns="http://www.w3.ore/1999/xhtml">
<head runat="server">
	<title></title>
</head>
	<body>
	<form id="form1" runat="server”>
	<div>
		<% DemoApplication.Tutorial tp=new DemoApplication.Tutorial();%>

		<%=tp.Name%>
	</div>
	</form>
	</body>
</html>
Code Explanation:-
When you run the above program in Visual Studio, you will get the following output.
Output:-

From the output, you see the message "gtupapers – ASP.Net" displayed.
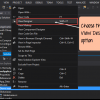
Step 6) Now let's add our test project to the Demo Application. This is done with the help of Visual Studio.

Step 7) The step involves the addition of the Unit Test project to the demo application.

You will eventually see the DemoTest project added to the solution explorer. With this, you can also see other files like UnitTest1.cs, properties, etc. are generated by default.

The test project created in the earlier section is used to test our ASP.Net application. In the following steps, we are going to see how to run the Test project.
Step 1) To test our Demo Application, first test project needs to reference the Demo Application. Add a reference to the Demo.aspx solution.

Step 2) The next step is to add a reference to the DemoApplication.

This will allow a demotest project to test our DemoApplication.
Step 3) Now it's time to add the test code to our test project.

You will see the below code added by Visual Studio in the UnitTest1.cs file. This is the basic code needed for the test project to run.

Step 4) The next step is to add the code which is used to test the string "gtupapers – ASP.Net."

using System;
using Microsoft.VisualStudio.TestTools.UnitTesting;
using DemoApplication;
namespace DemoTest
{
[TestClass]
public class UnitTestl
{
[TestMethod]
public void TestMethodl()
{
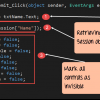
Tutorial tp = new Tutorial();
Assert.AreEqual(tp.Name,"gtupapers - ASP.Net");
}
}
}Step 5) Now let's run our test project. For this, we need to go to the menu option Test->Run->All Tests

Output:-

A test Explorer window will appear in Visual Studio. This will show the above result and display that a successful test was run in Visual Studio.
Summary
What is WCF? WCF stands for Windows Communication Foundation. It is used to create a distributed and...
What is ASP.Net? ASP.Net is a web development platform provided by Microsoft. It is used for...
In this tutorial, you will learn- Adding ASP.Net Controls to Web Forms Label Control Textbox List...
In this tutorial, you will learn- What is ASP.Net Life cycle? What is ASP.Net Page Life cycle?...
In any application, errors are bound to occur during the development process. It is important to...
The HTTP protocol on which all web applications work is a stateless protocol. By stateless, it...