C#

How to Download and Install Visual Studio for C#
Microsoft Visual Studio is an integrated development environment (IDE) from Microsoft. It is used...
In this tutorial, you will learn-
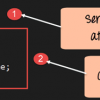
Inheritance is an important concept in C#. Inheritance is a concept in which you define parent classes and child classes.
The child classes inherit methods and properties of the parent class, but at the same time, they can also modify the behavior of the methods if required. The child class can also define methods of its own if required.
You will get a better understanding if we see this action.
Let's now see how we can incorporate the concept of inheritance in our code.
Step 1) The first step is to change the code for our Tutorial class. In this step, we add the below code to the Tutorial.cs file.

Note that we need to now add the access modifier of 'protected' to both the TutorialID and TutorialName field.
Remember we had mentioned this access modifier in the Access Modifier tutorial. Well here you can see the purpose of having this. Only when you have this access modifier (protected), the child class be able to use the fields of the parent class.
Step 2) The second step is to add our new child class. The name of this class will be "gtupapersTutorial". In this step, we add the below code to the Tutorial.cs file. The code should be placed after the Tutorial class definition.

Code Explanation:-
Note: - Even though we have not defined the TutorialName field in the "gtupapersTutorial" class, we are still able to access this field. This is because of the fact that "gtupapersTutorial" is a child class of Tutorial class. And because we made the fields of the Tutorial class as protected, they can be accessed by this class.
Step 3) The last step is to modify our main Program.cs file. In our console application, we are going to make an object of the gtupapersTutorial class. With this object, we are going to call the RenameTutorial method. We are then going to display the TutorialName field with the help of the GetTutorial method.

using System;
using System.Collections.Generic;
using System.Linq;
using System.Text;
using System.Threading.Tasks;
namespace DemoApplication
{
 class Tutorial
 {
  protected int TutorialID;
  protected string TutorialName;

  public void SetTutorial(int pID,string pName)
  {
   TutorialID=pID;
   TutorialName=pName;
  }

  public String GetTutorial()
  {
   return TutorialName;
  }
 }
  public class gtupapersTutorial:Tutorial
  {
   public void RenameTutorial(String pNewName)
   {
    TutorialName=pNewName;
   }

  static void Main(string[] args)
  {
   gtupapersTutorial pTutor=new gtupapersTutorial();

   pTutor.RenameTutorial(".Net by gtupapers");

   Console.WriteLine(pTutor.GetTutorial());

   Console.ReadKey();
  }
 }
}
Code Explanation:-
If the above code is entered properly and the program is executed successfully, the following output will be displayed.
Output:

From the output, we can clearly see that the TutorialName field was renamed to ".Net by gtupapers". This was made possible of the RenameTutorial method called by the child class.
Polymorphism is a OOPs concept where one name can have many forms.
For example, you have a smartphone for communication. The communication mode you choose could be anything. It can be a call, a text message, a picture message, mail, etc. So, the goal is common that is communication, but their approach is different. This is called Polymorphism.
You will get a better understanding if we see this action.
Let's now see, how we can incorporate the concept of Polymorphism in our code.
Step 1) The first step is to change the code for our Tutorial class. In this step, we add the below code to the Tutorial.cs file.

Code Explanation:-
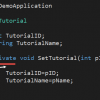
1 & 2) The first step is the same as in our earlier examples. We are keeping the definition of the SetTutorial method as it is.
3) This method sets the TutorialID and the TutorialName based on the parameters pID and pName.
4) This is where we make a change to our class wherein we add a new method with the same name of SetTutorial. Only this time we are only passing one parameter which is the pName. In this method, we are just setting the field of TutorialName to pName.
Step 2) The last step is to modify our main Program.cs file. In our console application, we are going to make an object of the gtupapersTutorial class.

using System;
using System.Collections.Generic;
using System.Linq;
using System.Text;
using System.Threading.Tasks;
namespace DemoApplication
{
 class Tutorial
 {
  public int TutorialID;
  public string TutorialName;

  public void SetTutorial(int pID,string pName)
  {
   TutorialID=pID;
   TutorialName=pName;
  }
  public void SetTutorial(string pName)
  {
   TutorialName=pName;
  }
  public String GetTutorial()
  {
   return TutorialName;
  }

  static void Main(string[] args)
  {
   Tutorial pTutor=new Tutorial();

   pTutor.SetTutorial(1,"First Tutorial");
   Console.WriteLine(pTutor.GetTutorial());

   pTutor.SetTutorial("Second Tutorial");
   Console.WriteLine(pTutor.GetTutorial());

   Console.ReadKey();
  }
 }
}
Code Explanation:-
If the above code is entered properly and the program is run the following output will be displayed. If in case you wanted to also fetch the Tutorial ID along with the Tutorial Name , you should follow the below step
Output:

From the output, we can clearly see that both methods were called successfully. Because of this, the strings "First Tutorial" and "Second Tutorial" were sent to the console.
Summary
Microsoft Visual Studio is an integrated development environment (IDE) from Microsoft. It is used...
The concept of Serialization and deserialization is used whenever data pertaining to objects have...
In this tutorial, you will learn- Access Modifiers Constructor Access Modifiers Access Modifiers or...
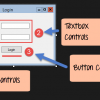
So far we have seen how to work with C# to create console based applications. But in a real-life...
C# is a general purpose programming language which encompasses various disciplines like...
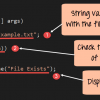
C# has a wide array of file operations. These operations include opening a file, reading or...