PHP

PHP String Functions: substr, strlen, strtolower, explode, strpos, str_replace
What is a string? A string is a collection of characters. String is one of the data types...
File management is essential to most web applications. If you are developing a content management system, then you will need to be able to upload images, word documents, pdf reports, etc. If you are working on a membership site, you may need to take a provision for people to upload their profile images. CodeIgniter's File Uploading class makes it easy for us to do all of the above.
In this tutorial, we will look at how to use the file upload library to load files.
File uploading in CodeIgniter has two main parts. The frontend and the backend. The frontend is handled by the HTML form that uses the form input type file. On the backend, the file upload library processes the submitted input from the form and writes it to the upload directory.
Let's begin with the input form.
Create a new directory called files in application/views directory
Add the following files in application/views/files
Add the following code to upload_form.php
<!DOCTYPE html>
<html>
<head>
    <title>CodeIgniter Image Upload</title>
    <meta charset="UTF-8">
    <meta name="viewport" content="width=device-width, initial-scale=1.0">
</head>
<body>
    <div>
        <h3>Select an image from your computer and upload it to the cloud</h3>
        <?php
                if (isset($error)){
                    echo $error;
                }
            ?>
            <form method="post" action="<?=base_url('store-image')?>" enctype="multipart/form-data">
                <input type="file" id="profile_image" name="profile_image" size="33" />
                <input type="submit" value="Upload Image" />
            </form>
    </div>
</body>
</html>
HERE,
Ad the following code to upload_result.php
<!DOCTYPE html>
<html>
<head>
    <title>Image Upload Results</title>
    <meta charset="UTF-8">
    <meta name="viewport" content="width=device-width, initial-scale=1.0">
</head>
<body>
    <div>
        <h3>Congratulations, the image has successfully been uploaded</h3>
        <p>Click here to view the image you just uploaded
            <?=anchor('images/'.$image_metadata['file_name'], 'View My Image!')?>
        </p>

        <p>
            <?php echo anchor('upload-image', 'Go back to Image Upload'); ?>
        </p>
    </div>
</body>
</html>
HERE,
Let's now create the controller that will respond to our image uploading
Add a new file ImageUploadController.php in application/controllers
Add the following code to ImageUploadController.php
<?php

defined('BASEPATH') OR exit('No direct script access allowed');

class ImageUploadController extends CI_Controller {

    public function __construct() {
        parent::__construct();
        $this->load->helper('url', 'form');
    }

    public function index() {
        $this->load->view('files/upload_form');
    }

    public function store() {
        $config['upload_path'] = './images/';
        $config['allowed_types'] = 'gif|jpg|png';
        $config['max_size'] = 2000;
        $config['max_width'] = 1500;
        $config['max_height'] = 1500;

        $this->load->library('upload', $config);

        if (!$this->upload->do_upload('profile_image')) {
            $error = array('error' => $this->upload->display_errors());

            $this->load->view('files/upload_form', $error);
        } else {
            $data = array('image_metadata' => $this->upload->data());

            $this->load->view('files/upload_result', $data);
        }
    }

}
HERE,
That is it for the controller. Let's now create the directory where our images will be uploaded to. Create a new directory "images" in the root directory of your application
Finally, we will ad two routes to our routes.php file that will display the form and display results
Open application/config/routes.php
Add the following routes
$route['upload-image'] = 'imageuploadcontroller';
$route['store-image'] = 'imageuploadcontroller/store';
HERE,
Let's start the built-in PHP server
Open the terminal/ command line and browse to the root of your application. In my case, the root is located in drive C:\Sites\ci-app
cd C:\Sites\ci-app
start the server using the following command
php -S localhost:3000
Load the following URL in your web browser
http://localhost:3000/upload-image
you will be able to see the following results

Click on choose file
You should be able to see a dialog window similar to the following
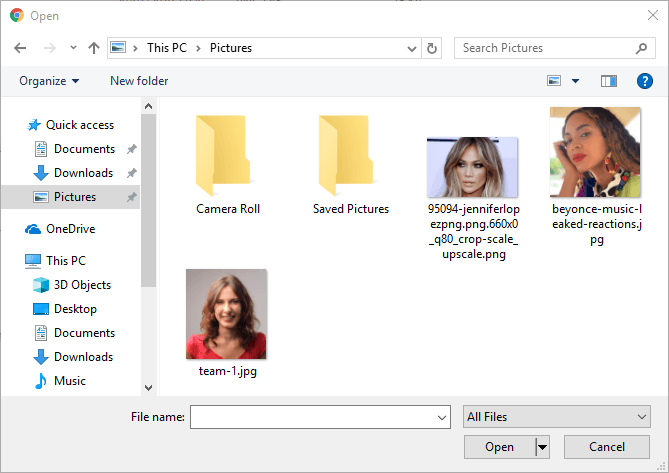
Select your desired image then click on open
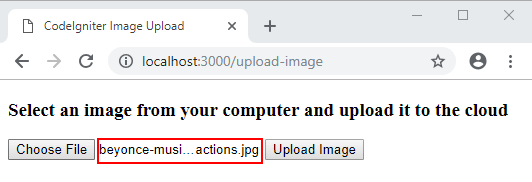
The selected file name will show up in the form upload as shown in the image above. Click on an upload image button
You will get the following results assuming everything goes well
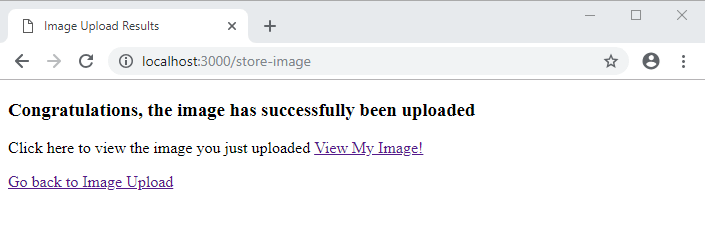
Click on View My Image! Link
You should be able to see the image that you uploaded. The results will be similar to the following
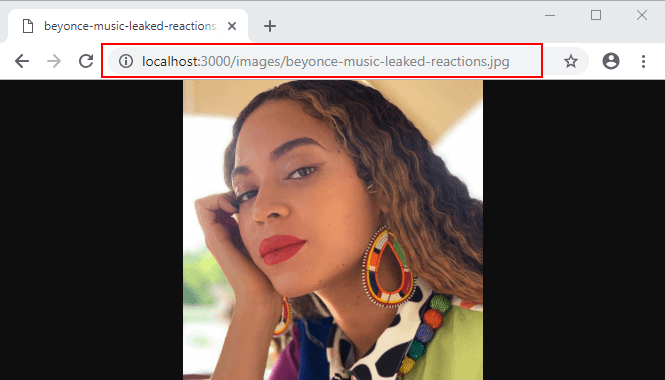
Notice uploaded image name is displayed in the URL. We got the image name from the uploaded image metadata
Note: The File Upload process remains the same for other types of files
What is a string? A string is a collection of characters. String is one of the data types...
Download PDF 1) What is PHP? PHP is a web language based on scripts that allow developers to...
What is a File? A file is simply a resource for storing information on a computer. Files are...
PHP Is not fair to compare PHP vs JavaScript, as they both have different purposes for web-site...
Training Summary PHP is the most popular scripting language on the web. Without PHP Facebook,...
What is Laravel? Laravel is an open-source web MVC framework for PHP. Laravel is a robust...