PHP

PHP MVC Framework Tutorial: CodeIgniter Example
What is PHP MVC framework? PHP MVC is an application design pattern that separates the application data...
If you have developed desktop applications before then, you probably know that you can define a global variable assign a value to it and use it throughout the life cycle of the application opening and closing more than one (1) and each request will have access to the global variable.
In other words, the state of the application is maintained. That is to say if when you logged in you set the company name to a global variable then even after you close the login form that state of the company name is preserved.
HTTP works a bit different from the above scenario that we have just described. It is stateless. That is that say whatever you do in one request does not persevere in the next request. T
o work around this problem. We have two (2) solutions in PHP. We can either work with cookies which are small files placed on the user's computer or work with sessions which are similar to cookies but are instead stored on the server and have a bigger capacity than cookies.
In this tutorial, you will learn-
Sessions are usually useful when you want to know the user's activities from page to page. For example, let's say you have a protected area on the website. The users don't need to login on each page. You can let the user login once and store their details in a session variable then reuse the same data on further requests. Other use cases include when working on a shopping system and the user has to add items to the shopping cart.
Alternatively, CodeIgniter also uses sessions to make data available only once on the next request. This is useful you have may be edited and updated a database record, and you want to return some feedback to the user when they are redirected to another page.
In this section, you will learn about sending flash messages to other pages using the session library in CodeIgniter
Create a new file SessionController in
application/controllers/SessionController.php
Add the following code
<?php defined('BASEPATH') OR exit('No direct script access allowed');

class SessionController extends CI_Controller {

    public function __construct() {
        parent:: __construct();

        $this->load->helper('url');
        $this->load->library('session');
    }

    public function index() {

        $this->load->view('sessions/index');
    }

    public function flash_message(){
        $this->session->set_flashdata('msg', 'Welcome to CodeIgniter Flash Messages');
        redirect(base_url('flash_index'));
    }
}
HERE,
Let's now create the view that will display the value of the session data.
Create a new directory session in application/views
Create a new file index.php in application/views/sessions
Add the following code
<html>
    <head>
        <title>Code Igniter Flash Session</title>
    </head>
    <body>
        <p>The session value of msg is <b> <?=$this->session->userdata('msg');?> </b></p>
    </body>
</html>
HERE,
Let's now create the routes for our session flash method
Open application/config/routes.php
Add the following lines
$route['flash_index'] = 'session controller';
$route['flash_message'] = 'session controller/flash_message';
Let's now start the built-in server for PHP and test our flash messages
Open the terminal
Run the following command
cd C:\Sites\ci-app
php -S localhost:3000
HERE,
Note: the application path has to match the path where you downloaded CodeIgniter, and you can use any port number that is free on your computer. It's not necessary to use port 3000.
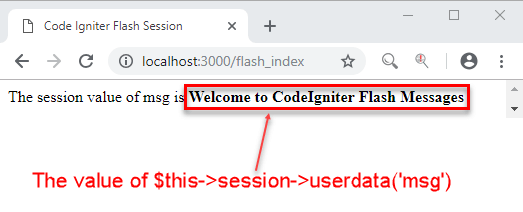
Load the following URL in your web browser
http://localhost:3000/flash_message
You will be redirected to the following URL, and you will get the following results
http://localhost:3000/flash_index
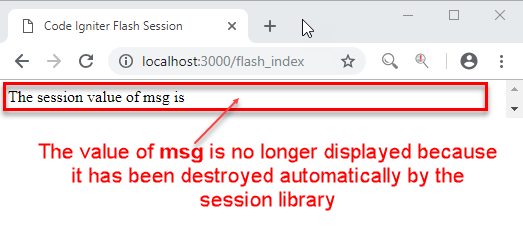
Click on the refresh button of your web browser or press F5
You will now get the following results
Let's now look at a slightly more advanced example. To make it simple, we will simulate user authentication and not do the actual implementation of verifying the user record in the database and the submitted password.
Let's start with the routes
Open routes.php located in application/config
Add the following routes
$route['login'] = 'sessioncontroller/login';
$route['authenticate'] = 'sessioncontroller/authenticate';
$route['settings'] = 'sessioncontroller/settings';
$route['dashboard'] = 'sessioncontroller/dashboard';
$route['logout'] = 'sessioncontroller/logout';
HERE,
Let's now update the SessionController
Open application/controllers/SessionController.php
Add the following methods
public function check_auth($page) {
        if (!$this->session->userdata('logged_in')) {
            $this->session->set_flashdata('msg', "You need to be logged in to access the $page page.");
            redirect('login');
        }
    }

    public function login() {
        $this->load->view('sessions/login');
    }

    public function authenticate() {
        $this->session->set_userdata('username', 'John Doe');
        $this->session->set_userdata('logged_in', TRUE);
        redirect(base_url('dashboard'));
    }

    public function dashboard() {
        $this->check_auth('dashboard');
        $this->load->view('sessions/dashboard');
    }

    public function settings() {
        $this->check_auth('settings');
        $this->load->view('sessions/settings');
    }

    public function logout() {
        $this->session->unset_userdata('username');
        $this->session->unset_userdata('logged_in');
        redirect(base_url('login'));
    }
HERE,
Create the following views in application/views/sessions
Add the following code to dashboard.php
<!DOCTYPE html>
<html>
    <head>
        <title>Dashboard</title>
        <meta charset="UTF-8">
        <meta name="viewport" content="width=device-width, initial-scale=1.0">
        <link rel="stylesheet" href="https://cdnjs.cloudflare.com/ajax/libs/bulma/0.7.2/css/bulma.min.css">
    </head>
    <body>
        <div class="container">
            <div class="column">
                <nav class="navbar" role="navigation" aria-label="main navigation">
                    <div id="navbarBasicExample" class="navbar-menu">
                        <div class="navbar-start">
                            <a href="/<?= site_url('dashboard')?>" class="navbar-item is-active">Dashboard</a>
                            <a href="/<?= site_url('settings')?>" class="navbar-item">Settings</a>
                        </div>

                        <div class="navbar-end">
                            <div class="navbar-item has-dropdown is-hoverable">
                                <a class="navbar-link"><?=$this->session->userdata('username');?></a>

                                <div class="navbar-dropdown">
                                    <a class="navbar-item">My Profile</a>
                                    <hr class="navbar-divider">
                                    <a class="navbar-item">Sign out</a>
                                </div>
                            </div>
                        </div>
                    </div>
                </nav>
                <h3>Welcome Page</h3>
            </div>
        </div>
    </body>
</html>
HERE,
Add the following code to login.php
<!DOCTYPE html>
<html>
    <head>
        <title>Login</title>
        <meta charset="UTF-8">
        <meta name="viewport" content="width=device-width, initial-scale=1.0">
        <link rel="stylesheet" href="https://cdnjs.cloudflare.com/ajax/libs/bulma/0.7.2/css/bulma.min.css">
    </head>
    <body>
        <div class="container">
            <div class="column">
                <p><?=$this->session->userdata('msg');?></p>
                <form method="post" action="<?= site_url('authenticate')?>">
                    <div class="field">
                        <label class="label">Username</label>
                        <div class="control">
                            <input class="input" type="text" placeholder="Text input">
                        </div>
                    </div>
                    <div class="field">
                        <label class="label">Password</label>
                        <div class="control">
                            <input class="input" type="passport" placeholder="Text input">
                        </div>
                    </div>
                    <div class="field is-grouped">
                        <div class="control">
                            <button class="button is-success">Login</button>
                        </div>
                    </div>
                </form>
            </div>
        </div>
    </body>
</html>
HERE,
Add the following code to settings.php
<!DOCTYPE html>
<html>
    <head>
        <title>Settings</title>
        <meta charset="UTF-8">
        <meta name="viewport" content="width=device-width, initial-scale=1.0">
        <link rel="stylesheet" href="https://cdnjs.cloudflare.com/ajax/libs/bulma/0.7.2/css/bulma.min.css">
    </head>
    <body>
        <div class="container">
            <div class="column">
                <nav class="navbar" role="navigation" aria-label="main navigation">
                    <div id="navbarBasicExample" class="navbar-menu">
                        <div class="navbar-start">
                            <a href="/<?= site_url('dashboard')?>" class="navbar-item">Dashboard</a>
                            <a href="/<?= site_url('settings')?>" class="navbar-item">Settings</a>
                        </div>

                        <div class="navbar-end">
                            <div class="navbar-item has-dropdown is-hoverable">
                                <a class="navbar-link">Jim Jones</a>

                                <div class="navbar-dropdown">
                                    <a href="#" class="navbar-item">My Profile</a>
                                    <hr class="navbar-divider">
                                    <a href="/<?= site_url('logout')?>" class="navbar-item">Sign out</a>
                                </div>
                            </div>
                        </div>
                    </div>
                </nav>
                <h3>Settings Page</h3>
            </div>
        </div>
    </body>
</html>
That's it for our views. Let's now test our application.
In this tutorial, we are using the built-in PHP web server, but you can use any web server that supports PHP.
Open the terminal
Run the following command
cd C:\Sites\ci-app
php -S localhost:3000
HERE,
Note: the application path has to match the path where you downloaded CodeIgniter, and you can use any port number that is free on your computer. It's not necessary to use port 3000.
Open the following URL in your web browser
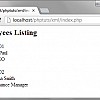
http://localhost:3000/dashboard
you will be redirected to the following page
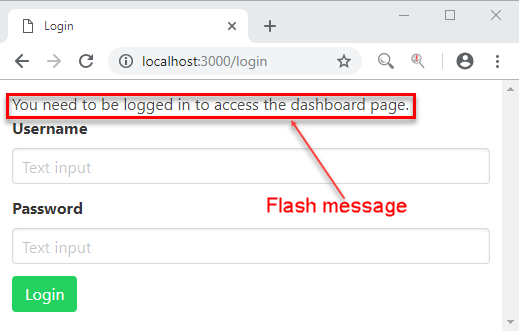
Click on the Login button
You will see the following results
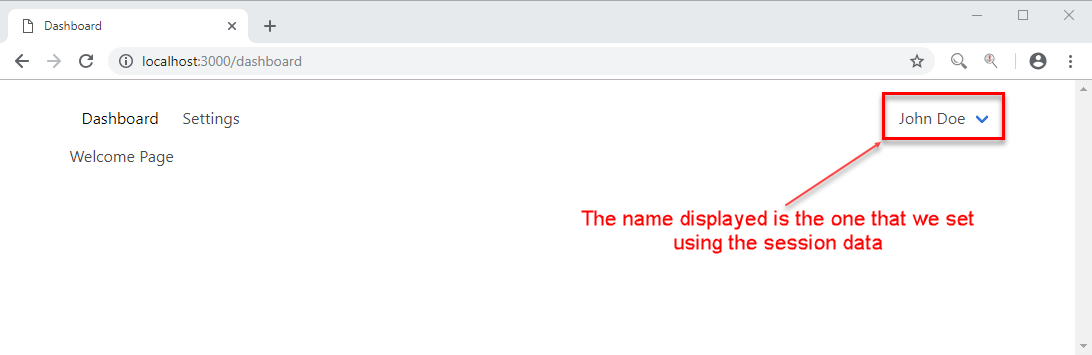
After we log in, we are now able to see the session data.
In this tutorial, you have learned the basics of CodeIgniter session library and learned how to use it to store temporal data as flash messages and how to use store more permanent data, i.e., user login data.
What is PHP MVC framework? PHP MVC is an application design pattern that separates the application data...
PHP Is not fair to compare PHP vs JavaScript, as they both have different purposes for web-site...
What is Ajax? AJAX full form is Asynchronous JavaScript & XML. It is a technology that reduces the...
Following are frequently asked Laravel and PHP related interview questions for freshers as well as...
What is XML? XML is the acronym for Extensible Markup Language. XML is used to structure, store...
PHP is a server-side scripting language used to develop static and dynamic websites or web...