Mobile Testing

Real Device Vs Simulator Vs Emulator Testing: Key Differences
In this tutorial, you will learn- What is Real Testing Device? What is Emulators? Difference...
Robotium is an android Testing framework to automate test cases for native and hybrid applications. Using Robotium, the developer can create strong automatic GUI testing case for Android applications. In addition, the developer could write a functional, system and acceptance test scenario, spreading many Android activities.
In this tutorial, you will learn-
Standard Android testing framework has some limitation as below
Robotiumframework is the better choice to conduct testing on Android application
Robotium is open source framework and is considered an extension of Android test framework. Using Robotium, developer can create robust automatic GUI test cases for Android applications. Moreover, developer can write functional, system and acceptance test scenarios, spanning multiple Android activities.
.png "Complete Guide to Android Testing & Automation") Robotium uses set of classes (com.jayway.android.robotium.solo) for testing. This class supports test cases that span over multiple activities. Solo is integrated with the ActivityInstrumentationTestCase2.
Robotium uses set of classes (com.jayway.android.robotium.solo) for testing. This class supports test cases that span over multiple activities. Solo is integrated with the ActivityInstrumentationTestCase2.
.png "Complete Guide to Android Testing & Automation") Tester can write test cases without knowledge of application design (black box testing) by using Robotium test case classes. It is an outstanding feature compare to Android test case classes.
Tester can write test cases without knowledge of application design (black box testing) by using Robotium test case classes. It is an outstanding feature compare to Android test case classes.
 This section guides you how to write an Android test program using Android Junit Test and Robotium. Assume that you have already developed an Android program name HelloAndroid. This program has some functions described below:
 You can download Eclipse IDE with built-in ADT (Android Developer Tools). It includes the essential Android SDK components and a version of the Eclipse IDE .
For the Robotium testing framework, you need to down Robotium library from Robotium webpage.
 Write name of your test project. As naming convention, your test project should be name "HelloAndroidTest"
.png "Your First Test with Android Testing Framework") Choose target application under test. In this case, this is HelloAndroid click Finish
Choose target application under test. In this case, this is HelloAndroid click Finish
 Base on your test specification, you started to create test suites for your test program. You can choose various Testing framework. In this tutorial, I choose standard Android testing framework ActivityInstrumentationTestCase2. You have to add Robotium library file to a libs directory in your project folder in case you want to test with Robotium framework. (You create lib folder in your project folder).
A test case defines the fixture to run multiple tests. To define a test case, you must follow the program structure below:
TestCase. .png "Your First Test with Android Testing Framework")
Test program's structure
package com.example.helloandroid.test;

import com.example.helloandroid.HelloAndroid;
import com.jayway.android.robotium.solo.Solo;
import android.test.ActivityInstrumentationTestCase2;
import android.widget.TextView;

public class HelloAndroidTest extends ActivityInstrumentationTestCase2 <HelloAndroid> {

	private HelloAndroid mActivity;
	private TextView mView;
	private String resourceString;
	private Solo solo;

	public HelloAndroidTest () {
		// TODO Auto-generated constructor stub
		super("com.example.helloandroid",HelloAndroid.class);
	}

	 @Override
	protected void setUp() throws Exception {
		// TODO Auto-generated method stub
	//	super.setUp();

	 	mActivity = this.getActivity();
		solo = new Solo(getInstrumentation(),getActivity());
		mView = (TextView) mActivity.findViewById(com.example.helloandroid.R.id.textview2);
		resourceString = mActivity.getString(com.example.helloandroid.R.string.hello_world);

	}

	 @Override
	protected void tearDown() throws Exception {
		// TODO Auto-generated method stub
		//super.tearDown();
		solo.finishOpenedActivities();
	}

	public void testPrecondition() {
		assertNotNull(mView);
	}

	/* test Target application contains a text display "Hello World!"*/
	public void testSearchText() {
		assertEquals(resourceString,(String) mView.getText());
	}

	/* test HelloAndroid Activity on target application is exist*/
	public void testCurrentActivity() throws Exception  {
    	solo.assertCurrentActivity("wrong activity", HelloAndroid.class);
    }

	/* test Application UI contains "Start" button */
	/* send event click button to target application */
    public void testSearchButton() throws Exception {
    	boolean found = solo.searchButton("Start");
    	solo.clickOnButton("Start");
    	assertTrue(found);
    }


} .png "Your First Test with Android Testing Framework") These test suites above verified that Application GUI must display a text "Hello World!", and contains a button name "Start".
These test suites above verified that Application GUI must display a text "Hello World!", and contains a button name "Start".
After you finish writing your test program, run the test using the steps below
 Besides running test on IDE, you can run test on command line. In this test program, test package is com.example.helloandroid.test . In Linux terminal, you can use following command to run all test in this package:
$ adb shell am instrument -w -e package com.example.helloandroid.test
After test executes, you get test results .
In this test program, 4 test methods are executed. In this case, all test cases are passed. In case test case fails, the output is display and show you which test cases failed This tutorial will help you to understand APPIUM automation tool. It will cover desired...
In this tutorial, you will learn- What is Real Testing Device? What is Emulators? Difference...
What is ADB? Using any real device for mobile automation Testing is always been a challenge for...
Following are frequently asked mobile application testing interview questions and answers for...
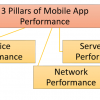
For any mobile app, performance is very critical. If your Mobile App does not perform well, the...
What is Interrupt Testing? Interrupt Testing is a branch of Mobile Application Testing that deals...