Jmeter

What is JMeter? Introduction & Uses
What is JMeter? Why it is used? The Apache JMeter TM is pure Java open source software, which was...
As soon as you launch JMeter, you will see 2 elements

Test Plan is where you add elements required for your JMeter Test.
It stores all the elements (like ThreadGroup, Timers etc) and their corresponding settings required to run your desired Tests.
The following figure shows an example of Test Plan

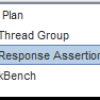
The WorkBench simply provides a place to store test elements temporarily. WorkBench has no relation with Test Plan. JMeter will not save the contents of the WorkBench. It only saves the contents of the Test Plan branch

"WorkBench" will be used in our tutorial HTTP Proxy Server Recording Test
For now, ignore it.
Adding Elements is the essential step to build a Test Plan because without adding elements, JMeter cannot execute your Test Plan
A Test Plan includes many Elements such as Listener, Controller, and Timer
You can add an element to test plan by right-clicking on a Test Plan and choose new elements from "Add" list.
Suppose, you want to add 2 elements to Test Plan BeanShell Assertion and Java Request Default

The numbers to the left of the green box are the number of active threads / total number of threads.
To Stop the Test, press Stop button or use short key Ctrl + '.'

When test execution is done, you can get the test report. The test report includes the error log file, which is saved in jmeter.log, and the test results summary. Here is a sample log file of JMeter
- 2013/08/18 08:41:12 INFO - jmeter.JMeter: Copyright (c) 1998-2013 The Apache Software Foundation
- 2013/08/18 08:41:12 INFO - jmeter.JMeter: Version 2.9 r1437961
- 2013/08/18 08:41:12 INFO - jmeter.JMeter: java.version=1.7.0_25
- 2013/08/18 08:41:12 INFO - jmeter.JMeter: java.vm.name=Java HotSpot(TM) Client VM
- 2013/08/18 08:41:12 INFO - jmeter.JMeter: os.name=Windows 7
- 2013/08/18 08:41:12 INFO - jmeter.JMeter: os.arch=x86
- 2013/08/18 08:41:12 INFO - jmeter.JMeter: os.version=6.1
- 2013/08/18 08:41:12 INFO - jmeter.JMeter: file.encoding=Cp1252
- 2013/08/18 08:41:12 INFO - jmeter.JMeter: Default Locale=English (United States)
- 2013/08/18 08:41:12 INFO - jmeter.JMeter: JMeter Locale=English (United States)
- 2013/08/18 08:41:12 INFO - jmeter.JMeter: JMeterHome=C:\Nguyen\Source_code\apache-jmeter-2.9
- 2013/08/18 08:41:12 INFO - jmeter.JMeter: user.dir =c:\Nguyen\Source_code\apache-jmeter-2.9\bin
- 2013/08/18 08:41:12 INFO - jmeter.JMeter: PWD =C:\Nguyen\Source_code\apache-jmeter-2.9\bin
What is JMeter? Why it is used? The Apache JMeter TM is pure Java open source software, which was...
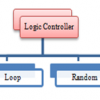
What is the Logic Controller? Logic Controllers let you define the order of processing request in...
What is an Assertion? Assertion help verifies that your server under test returns the expected...
Operating system Support for JMeter JMeter is a pure Java application and should run correctly on any...
What are Timers? By default, JMeter sends the request without pausing between each request. In...
{loadposition top-ads-automation-testing-tools} JMeter is an open source load and performance...