HP ALM
Test Lab in HP ALM (Quality Center)
Once the test design is completed, test execution will take place with the help of Test Lab...

In reality, when a product development happens, there are various release for a particular product

This module helps us to create and manage releases and cycles which is the first step before proceeding to create any work item such as requirements/tests/defects. It also helps us work with project planning and tracking. Following functionalities are vital in this tab.
Note: before starting with exercise, refer this interactive tutorial to learn how to login in ALM
Creating releases is the first step in ALM and all other work item such as requirements, test cases and defects are traced based on the releases/cycles.
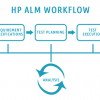
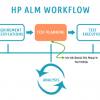
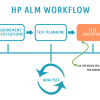
As explained in workflow, we will have two releases this year for gtupapers banking application with the following timelines.
Release Name | Start Date | End Date |
2017 R1 | 01/01/2017 | 21/06/2017 |
2017 R2 | 01/07/2017 | 31/12/2017 |
Step 1) First step is to navigate to Management tab and click on "Releases" Tab. The landing page would appear as shown below:

Step 2) Before creating a release, we can create a container/folder by clicking on a "New Folder" icon in releases module as shown below. Give the folder name 2017

Step 3) Next step is to create new releases. To create a new release, click "new release" button and the New Release dialog opens. Enter the following mandatory details

Step 4) After Entering the above details click "OK". The Release will be created as shown below.

Likewise you can create other Release R2
Step 5) Upon Selecting a particular Release, one can see the tabs that are relevant to the Releases.

Step 6) Now let us understand the important tabs available under "Releases" Module. Select Details Tab to retrieve the information about the details of the release that was provided during the creation of the Release.

Step 7) Select Release Scope Tab that provides the details about the scope of that release. We haven't created scope for this release; hence the scope list is empty. Creation of milestones and scope will be dealt in detail in a separate module.

Step 8) Master Plan provides the pictorial representation of the timeline. If cycles are created, the master plan would include cycle timelines for that release as well.

Step 9) Status Tab shows details about the release regarding the overall progress of that release.


In reality, each one of the releases is further broken down into cycles and let us understand how to create cycles in ALM. Let us say in our case there are two cycles in a release.
| Release | Cycle Name | Cycle Start Date | Cycle End Date |
| Release R1 | Cycle 1 | 01/01/2017 | 31/03/2017 |
| Cycle 2 | 01/04/2017 | 30/06/2017 | |
| Release R2 | Cycle 1 | 01/07/2017 | 30/09/2017 |
| Cycle 2 | 01/10/2017 | 31/12/2017 |
Step 1)Select the Release under which you would like to create cycles and click on "New Cycles" button and the new cycles dialog box opens where the release timelines are prepopulated as this cycle is created under the selected release. User has to enter the following mandatory details in 'New Cycles' Window:

Step 2)Once all the cycle is created, user can access the same under created Release as shown below.

Step 3) Select a particular cycle to access details of that cycle.

Step 4) Now let us understand all the other important tabs present under "Cycles". User can attach any attachment under 'attachments' Tab. 'The Progress tab' gives the status of that cycle under the selected Release.


Step 5 ) The Quality Tab provides the information such as Defect opening rate and number of outstanding defects which is the preliminary information about the quality of the current cycle.


Each Release has a scope and milestone associated with it that can be added under "Release Scope" Tab under Releases.
Step 1)Upon clicking on "+" icon in releases scope tab of releases module, New Scope dialog opens.

Enter the following details.

Step 2) Upon clicking on "OK" button, all the added scope is shown in the "Release Scope" tab as shown below.

Step 1) New Milestone can be created only under a release using a "New Milestone" Icon as shown below.

Step 2) While creating a milestone following fields are mandatory.

Step 3) The created Milestone is shown as below.

Step 4) Now user can map a milestone scope against the created project scope. To perform the same, select the milestone and navigate to Milestone Scope and select the corresponding scope and map it.

Once the test design is completed, test execution will take place with the help of Test Lab...
Defining the Requirements is one of the preliminary phases for software development lifecycle....
Before Installing ALM 12.55, one has to understand the system requirements. We will go through how to...
A Defect is logged during the test execution, when expected result and actual result don't match...
{loadposition top-ads-automation-testing-tools} ⚡ What is ALM? Application Lifecycle Management is...
After defining requirements, development team kick starts their design and development process...