HP ALM

What is ALM? Application Lifecycle Management
What is ALM? ALM is a process of specification, design, development, and testing of a software...

We will make use of the sample application (gtupapers Banking) to understand it better.
In this tutorial we will learn

Step 1) Click on 'Requirements' in 'Requirements' module.

Step 2) Let us maintain all the requirements for this release(2017 R1) in a specific folder so that it would be easy for us to access. In addition to that we would like to show the distinction between 'Functional' and 'Non Functional' requirements by placing them in different folders.

Step 3) The created folder would be shown as displayed below.

Step 4) Now let us create a folder for 'Functional' Requirements where are all the Functional requirements documents/work items are maintained.

Step 5) The Created Folder will be displayed in 'Requirements' module as shown below.

Step 6) Similarly create 'Non Functional' Folder. Upon creating both Functional and Non Functional folder, we will have the folder structure as shown below.

Step 7) Click 'New Requirements' icon in the requirements page as shown below.

The 'New Requirements' dialog opens up and user has to enter the following mandatory fields.

Step 8) User can also enter the following Non-Mandatory fields.
Step 9) Requirements also allows users to enter the requirements in 'Rich Text' format directly as shown below.

Step 10) Usually, requirements are captured in a word document. They be uploaded under attachments tab as shown below. ALM also support all other file types like .xls, .jpg etc. After uploading click Submit button.

Step 11) The requirement would be displayed to the user as shown below:

Sometimes, user won't be creating requirements manually. It is easy to upload all requirements in bulk rather than creating each one by one, which is a time consuming process. In order to facilitate uploading into ALM, HP has come up with an Addin with which the user can upload from MS excel/MS Word directly. Let us understand the step by step procedure to upload requirements into QC from Excel.
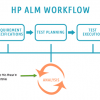
For uploading Requirements, we need to understand the workflow:

Step 1) Navigate to ALM home page http://localhost:8181/qcbin and click on "Tools" from the list of links.

Step 2: Click on "More HP ALM Add-ins" Link from the add-ins page as shown below.

Step 3) Select 'Add-ins for Microsoft Applications' and select 'Microsoft Excel' from the link as we would be using MS Excel add-in to upload the Data into HP-ALM.

Step 3) Select HP-ALM Microsoft Excel Add-in for ALM 12.00 link.

Step 4) Select HP-ALM Microsoft Excel Add-in for ALM 12.00 link. Users can also refer to the 'Read-me' Guide and 'Add-in' Guide. Upon clicking on the link, the add-in set up file will be downloaded to default location/user selected location.

Step 1) Select the downloaded add-in and perform a right click on the downloaded file. Select 'Run as Administrator'.

Step 2) Select the downloaded add-in and perform a right click on the downloaded file. Select 'Run as Administrator' so that we can install the add-in.

Step 3) Select the installation type. Here we have selected 'For All Users' which was the default setting. If you wish to install only for the current user please select 'For Current User Only' and click 'Next'.

Step 4) Upon completion of the installation, user would get the status message. Click 'Finish' Button.

Step 5) To verify if the add-in got successfully installed, open Excel and navigate to 'Add-ins' Tab. You will find an option 'Export to HP ALM' which means the 'add-in' got installed successfully.

Step 1) Before uploading the requirements from excel, we need to prepare the Excel such that it can be uploaded.

Step 2) After selecting the data to upload, click 'Export to HP ALM' from 'Add-Ins' .

Step 3) The ALM Export Wizard opens. Enter the HP ALM Server URL and Click 'Next'.

Enter the user name and password for authentication and Click 'Next'.

Step 3) Select the Domain, Project Name into which we would like to upload the requirements and Click 'Next'.

Step 4) Select the type of data that we would like to upload. In this case, it is requirements. We can also upload Tests/Defects which we will deal with it later.

Step 5) Enter the New Map name. The first option, 'Select a map' is disabled because we haven't created a map so far. Hence we should create new map name and click 'Next'. We haven't selected 'Create a Temporary map' as we would like to reuse every time for uploading 'Requirements'.

Step 5b) In this dialog, user has to choose the requirement type behavior. If we are uploading only one type of requirement, then we should select 'Single Requirement Type'.
We are uploading different requirement types. Hence we have to map against the corresponding column in excel. As per our template, Column 'E' carries the requirement type.

Step 6) Upon Clicking 'Next', the mapping dialog opens as shown below.

Now let us understand how to map the fields in Excel against the fields in ALM.
Select the Field that user would like to map and click on the arrow button as shown below.

Enter the column name in Excel that corresponds to the appropriate column name in HP ALM.


Step 8) Upon successful upload, ALM displays the message as shown below. If errors appear please fix the issue and try re-uploading the same.

Step 11) Now let us verify the same under 'Requirements' Tab. All the requirement details including attachments are uploaded as shown below.

Once the user has mapped all the requirements, tests and defects as discussed in each one of those chapters, we will be able to generate coverage analysis and traceability Matrix.
Coverage Analysis helps us to understand the Test coverage against a specific requirement and details about number of tests passed/failed/not executed.
Step 1) Navigate to requirements module and Click on 'View' Menu and select 'Coverage Analysis'.

Step 2) The coverage Analysis will be generated against each one of the requirements placed under 'Requirement Tab' with consolidated status on a folder level.

Step 3) Upon expanding the folder, the coverage analysis will be displayed as shown below.

Step 4) Click on each one of those coverage analysis status to get a drill down report.

Step 5) Uponclicking 'Show Test Coverage', the test execution status against the selected requirement will be displayed.

Traceability Matrix :
Step 1) First Step is to navigate to 'View' Menu and select 'Traceability Matrix'.

Step 2) The Traceability Matrix page opens as shown below.

Step 3) The criteria for generating the Traceability Matrix is shown below.

Step 4) The Filter requirement dialog displays the filter criteria as selected by the user. Click 'OK'.

Step 5) The Configure Traceability Dialog is displayed

Step 6) Let us generate the traceability matrix between requirements and tests. Hence upon clicking on 'Filter by linked tests', the following dialog is displayed to the user.

Step 7) Following screen is displayed to the user with all the requirements and its corresponding tests if the specified traceability matrix criteria is met.

Step 8) User can also click on 'Generate Traceability matrix' that can be exported to excel.

Step 9) The File save dialog is displayed to the user.

Step 10) Upon clicking 'Save' Button, the traceability matrix is generated to the user.

Here is a Video on Requirements module key takeaways:-
What is ALM? ALM is a process of specification, design, development, and testing of a software...
Before Installing ALM 12.55, one has to understand the system requirements. We will go through how to...
ALM allows users to generate reports and graphs at any time during the software development...
1. What is HP ALM (Quality Center) used for? Or What are the benefits and features of Quality...
ALM allows integration with other HP products such as HP UFT and Hp Load Runner. HP UFT is a...
{loadposition top-ads-automation-testing-tools} ⚡ What is ALM? Application Lifecycle Management is...