Mobile Testing
Connect Mobile Device with Android Debug Bridge(ADB) to USB, WiFi
What is ADB? Using any real device for mobile automation Testing is always been a challenge for...
Have you ever developed an Android application and publish it to Google Play? What will you do if you get a user review like -

When you publish an app to Google Play, it must be well tested to avoid the potential bugs. There's a ton of test scenarios that should be executed before publishing an app. To save the Testing effort, you need a testing tool. One of the best testing tools for Android app is Selendroid.
Selendroid is a test automation framework for multi-type of mobile application: native and hybrid Android app and mobile web.

You can write the tests using the Selenium 2 client APIs. Because Selendroid still reuses of the existing Selenium infrastructure for the web
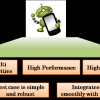
Selendroid is a powerful testing tool. It can be used on emulators and real devices

Selendroid is a great testing tool. But you may still doubt its usefulness.

This section will introduce the important features of the Selendroid to answer the question why you need Selendroid.

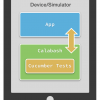
Selendroid is based on the Android instrumentation framework. Selendroid tests are written base on the Selenium Web driver client API, so it supports full integration with current Selenium frameworks.
The following figure describes the architecture of Selendroid

Selendroid contains 4 major components:

You already have known the importance of the Selendroid. Now let's get our hands dirty with Selendroid.
There're 3 steps should be done before the first test with Selendroid

Selendroid can work on Window, Linux and Mac OS. In this tutorial, we will setup Selendroid in Window OS.
Before using Selendroid, you need install following package first
You must accept the license agreement and download the java installer (Choose x64 or x86 base on your OS)

Download and install the Java SDK as normal software
Step 1) On Window, right-click Computer -> Properties -> Advanced System Setting

Step 2) System Properties window display, select tab Advanced -> Environment Variables

Step 3) The Environment window display, click New -> Enter a variable ANDROID_HOME as following

The variable value is the path to android-sdks which you already installed.
Find the system variable Path -> Edit -> Add the following line after the current line


Similar to ANDROID_HOME, add new variable JAVA_HOME with value as below

The value is the Path to your Java JDK installation
Step 4) Restart your PC -> Done
Step 1) Getting an application under test
You can use existing Selendroid test app to check that how Selendroid works (Link to sample application under test)
Once a download is complete, copy this APK and the above Selendroid Standalone jar file to a folder with the name "gtupapers"
Step 2) Launch the Selendroid
Open the terminal on Windows & navigate to the folder gtupapers created in step 1.
Run the following command

The output will display as following

After running this command, Selendroid-standalone HTTP server starts! The default port number of this server is 4444. All hardware device, as well as Android Virtual Device, will be scanned and recognized automatically. Selendroid will identify the Android target version and device screen size.
To check the Android target version as well as the device information, you can launch the following URL on a browser:
http://localhost:4444/wd/hub/status.

This section introduces you some basic Selendroid-Standalone command line. You may use them to set up the Selendroid testing environment
The default port of Selendroid is 4444. But you can change to other port by adding a parameter to the command to launch Selendroid
Parameter: -port [port number]
For example:

In above command, 5555 is the new port.
So the URL to check the Android target version is changed to: http://localhost:5555/wd/hub/status
Parameter: -app [file path]
For example:

In above command, the Selendroid automatically find the binary file base on the "C:\gtupapersApp.apk" to get the information of the application under test.
Check the URL http://localhost:4444/wd/hub/status, you will see this information

Parameter: -selendroidServerPort [port number]
Example

The port now is changed to 9000
Parameter: -timeoutEmulatorStart
By default, Selendroid will wait 300,000 milliseconds until the emulator starts. You can change to new timeout (200,000 ms) by command

After this time our expired, if the emulator cannot start, the Selendroid will throw the exception error (Error occurred while looking for devices/emulators.) then stop running
Parameter: -logLevel [type of log]
The log level values are ERROR, WARNING, INFO, DEBUG, and VERBOSE. Default: ERROR.
For example, set Selendroid to print the WARNING log only, you can use this command

The Selendroid only print the WARNING log
This section is a step by step guide to creating your first test script using Selendroid
Suppose we have an Android application under test name gtupapersApp. The application includes a text field and a button name "Show Text".

We need to execute following Test Case using Selendroid
Test Cases | Condition | Expected output: |
| The binary of the application under test is available A device is connected to PC | The text "Text Show here" is changed to the text which user enter in a text field |
Step 1) Create a Java project in Eclipse
Step 2) Add selenium and Selendroid jar file in eclipse environments
Right-click gtupapersTest Project -> Build Path -> Add External Archives

Navigate to the folder which stored the jar files
There're 3 jar files should be added
Select all -> Choose Open to add a jar file to the project

Step 3) after adding the above library, those libraries will be added to the Reference Libraries of the test project. A tester can use the APIs of those libraries to develop the test program
Create package "com.guru.test" and add java file "gtupapersTest.java" like below
Right Click gtupapersTest -> New -> Package

Type com.guru.test to the Name field on New Java Package dialog à Finish

The Eclipse will create list folders and subfolders like this in the source code structure

Step 4) Install TestNG for Eclipse
In Eclipse, Help -> Install New Software, in the Install Dialog, click Add and enter the following
Press OK -> Next to install the TestNG

Step 5) Copy the gtupapersApp.apk to the folder of Test App

Step 6) Get the ID of an application under test.
Suppose we have an APK file name gtupapersApp.apk. Follow the step which is described in previous section, execute the command on terminal

Open following link in a browser
http://localhost:4444/wd/hub/status.
The information of the device is displayed, copy the appId value "com.gtupapersapp:1.0"

Step 7) Open the file gtupapersTest.java (in the sample code) and change as following

To create a new test session with Selendroid, you have to provide the app id in the format: com.gtupapersapp:1.0. This app Id can is identified in step 6. If you don't set the app Id matching the Android device, the test session will throw an error and will not start.
After initializing the found device, Selendroid creates a customized selendroid-server and installs the Selendroid server on it
Selendroid also installs the application under test and starts the selendroid-server on device
After initializing the test session successfully, the test command is started executing on a device. (Such as entering text, press button…). If the test appends the test session, the emulator will stop automatically
Step 8) Start the new test session
Launch the Selendroid server using the following command on terminal like step 6

After the Selendroid Server started, open the sample test project gtupaperstest on Eclipse, set a breakpoint at line 77 on file gtupapersTest.java by double click to the line 77 -> A dot will display like below

Start a test session by right Click to gtupapersTest project -> Debug As -> Testng Test.
A test session will start like below

Step 9) Get the Id of GUI element of an application under test
After test session start successfully, open browser, navigate to the URL http://localhost:4444/inspector
You will see the Application Under Test is launched like below

Use mouse hover to each UI element of AUT (Button, TextField, Text Label), the ID of each element will highlight on the right pane

After this step, you can get the ID of each above UI element
Those IDs will be used in next step
Step 10) Enter the test program like below
A test program using Selendroid includes 3 sections
Setup Test:
Following is the code for setup test, it will set up the condition for a test session.In case of an error, the Selendroid will throw the exception and the test app will stop.
The code includes the comments to explain each the statement.
package com.guru.test;

 import io.selendroid.SelendroidCapabilities;
		import io.selendroid.SelendroidConfiguration;
		import io.selendroid.SelendroidDriver;
		import io.selendroid.SelendroidLauncher;
		import io.selendroid.device.DeviceTargetPlatform;

		import org.openqa.selenium.By;
		import org.openqa.selenium.WebDriver;
		import org.openqa.selenium.WebElement;
		import org.testng.Assert;
		import org.testng.annotations.AfterSuite;
		import org.testng.annotations.BeforeSuite;
		import org.testng.annotations.Test;

 /**
		 * @author gtupapers Test App using Selendroid
			 * Application under test: gtupapersApp
		 *
		 */
		public
				class gtupapersTest {

				     //Declare web driver variable
		    private WebDriver driver;


		    /**
		     * Setup the environment before testing
		     * @throws Exception
			     */
		    @BeforeSuite
		    public
					void setUp() throws Exception {

        //Start selendroid-standalone during test
		        SelendroidConfiguration config = new SelendroidConfiguration();

		      // Add the selendroid-test-app to the standalone server
		        config.addSupportedApp("gtupapersApp.apk");


		        //start the standalone server
		        SelendroidLauncher selendroidServer = new SelendroidLauncher(config);
			        selendroidServer.launchSelendroid();

		       // Create the selendroid capabilities
		        SelendroidCapabilities capa = new SelendroidCapabilities();


		       // Specify to use selendroid's test app
		        capa.setAut("com.gtupapersapp:1.0");

		       // Specify to use the Android device API 19
		        capa.setPlatformVersion(DeviceTargetPlatform.ANDROID19);

		        // Don't request simulator, use real device
		        capa.setEmulator(false);


		        //capa.wait(10000000);

		        // Create instance of Selendroid Driver
		        driver = new SelendroidDriver(capa);

		    }
Execute Test
Below is the code to execute a test. The code includes the comments
Here are the test steps again
 /**
		     * Start execute the test case
		     * 01. Enter the text "Selendroid" to the textfield
		     * 02. Press OK button
		     * @throws Exception
			     */
		    @Test
		    public
					void selendroidTest() throws Exception {

		        // Print the log
		        System.out.print("Start executing test");

		        // Find the input text field on screen
        // The id of this text field was get from step 9
		        WebElement inputField = driver.findElement(By.id("edtText"));

		        // Verify that the text field enabled so user can enter text
		        Assert.assertEquals("true", inputField.getAttribute("enabled"));

		        // Enter a text to text field
		        inputField.sendKeys("Hello Guru");

         // click Show Text button
        // The id of this button was get from step 9
		        WebElement button = driver.findElement(By.id("btnShow"));
					        button.click();

		        // Delay time to take effect
		        Thread.sleep(5000);

		        //Find the label "Text Show Here" on screen
        // The id of this label was get from step 9
		        WebElement txtView = driver.findElement(By.id("txtView"));

		        //Get the text display on screen
		        String expected = txtView.getText();

		// Verify that the text which user enter on text field is same as text display on screen
		        Assert.assertEquals(expected, inputField.getText());

     }
Finish Test
The following code will complete the test by stopping the Selendroid driver.
 /**
		     * Stop the Selendroid driver
		     *
		     */
		    @AfterSuite
		    public
					void tearDown() {
					        driver.quit();
			    }
You can see the detail in sample code included in this article.
Step 10) Connect Android device to the PC via USB cable. Points to observe -
Step 11) Run the Test App: Right click gtupaperstest -> Run as -> TestNG test

Step 10) The Script start executed as following

Step 12) After test finishes execution, TestNG auto generates the test report as following


Good Job, you are done the test now.
Summary
What is ADB? Using any real device for mobile automation Testing is always been a challenge for...
What is the Robotium? Robotium is an android Testing framework to automate test cases for native...
To guarantee the quality of your iOS application, you should follow the Test-Driven development ...
Mobile testing is the procedure in which the mobile apps are tested for functionality, usability,...
In this tutorial, you will learn- What is Real Testing Device? What is Emulators? Difference...
What is Calabash? Calabash is an open source Acceptance Testing framework that allows you to write...