JUnit
JUnit @Ignore Test Annotation with Example
Sometimes you may require not to execute a method/code or Test Case because coding is not done...
Parameterized test is to execute the same test over and over again using different values. It helps developer to save time in executing same test which differs only in their inputs and expected results.
Using Parameterized test, one can set up a test method that retrieves data from some data source.
Consider a simple test to sum different numbers. The code may look like -

The approach above leads to lot of redundancy.
We need a simple approach and. Using parameterized test you can just add a method to input 10 data inputs and your test will run 10 times automatically.
Following code shows an example for a parameterized test. It tests sum() method of the Arithmetic class :
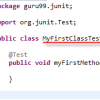
Step 1) Create a class. In this example, we are going to input two numbers by using sum (int,int) method which will return the sum of given numbers

Step 2) Create a parameterized test class

Code Explanation
@RunWith(class_name.class): @RunWith annotation is used to specify its runner class name. If we don't specify any type as a parameter, the runtime will choose BlockJunit4ClassRunner by default.
This class is responsible for tests to run with a new test instance. It is responsible for invoking JUnit lifecycle methods such as setup(associate resources) and teardown(release resources).
To parameterize you need to annotate using @RunWith and pass required .class to be tested
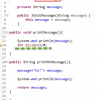
Step 3) Create a constructor that stores the test data. It stores 3 variables

Step 4) Create a static method that generates and returns test data.

Code Line 32,33: Creating a two-dimensional array (providing input parameters for addition). Using asList method we convert the data into a List type. Since, the return type of method input is collection.
Code Line 30: Using @Parameters annotation to create a set of input data to run our test.
The static method identified by @Parameters annotation returns a Collection where each entry in the Collection will be the input data for one iteration of the test.
Consider the elemenent
{1,2,3}
Here
firstNumber =1
secondNumber=2
expectedResult=3
Here each array element will be passed to the constructor, one at a time as the class is instantiated multiple times.
Step 5) The complete code

Code Explanation:
Step 6) Create a test runner class to run parameterized test:

Code Explanation:
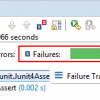
Output:
Here is the output which shows successful test with no failure trace as given below:

See the result on console,which shows addition of two numbers :-

Summary:
Parameterized test enables developer to execute the same test over and over again using different values.
Important annotations to be used during parameterization
Sometimes you may require not to execute a method/code or Test Case because coding is not done...
In a normal scenario, whenever you identify any error during test execution, you would stop the...
What is Junit Assert? Assert is a method useful in determining Pass or Fail status of a test case,...
Installing Junit is a 6 part process. It is explained in detailed below- PART 1) Install Java...
In Junit, test suite allows us to aggregate all test cases from multiple classes in one place and...
JUnit provides the facility to trace the exception and also to check whether the code is throwing...