JUnit
JUnit Parameterized Test with Example using @Parameters
What is Parameterized Test in Junit? Parameterized test is to execute the same test over and over...
JUnit is the most popular unit Testing framework in Java. It is explicitly recommended for Unit Testing. JUnit does not require server for testing web application, which makes the testing process fast.
JUnit framework also allows quick and easy generation of test cases and test data. The org.Junit package consist of many interfaces and classes for JUnit Testing such as Test, Assert, After, Before, etc.
Before we understand what a test fixture is, let's study the code below
This code is designed to execute two test cases on a simple file.
public class OutputFileTest {
    private File output;
    output = new File(...);
    output.delete();
public void testFile1(){
        //Code to verify Test Case 1
}
    output.delete();
    output = new File(...);
public void testFile2(){
        //Code to verify Test Case 2
}
 output.delete();
}
Few issues here
Compare the same code using JUnit
public class OutputFileTest
{
    private File output;
    @Before public void createOutputFile()
    {
       output = new File(...);
    }

	@After public void deleteOutputFile()
    {
        output.delete();
    }

    @Test public void testFile1()
    {
       // code for test case objective
    }
	@Test public void testFile2()
    {
       // code for test case objective
    }
}
The code far more readable and maintainable. The above code structure is a Test fixture.
A test fixture is a context where a Test Case runs. Typically, test fixtures include:
These annotations are discussed below-
Setup
@Before annotation is used on a method containing Java code to run before each test case. i.e it runs before each test execution.
Teardown (regardless of the verdict)
@After annotation is used on a method containing java code to run after each test case. These methods will run even if any exceptions are thrown in the test case or in the case of assertion failures.
Note:
Example: Creating a class with file as a test fixture
public class OutputFileTest
{
    private File output;
    @Before	public void createOutputFile()
    {
       output = new File(...);
    }

	@After public void deleteOutputFile()
    {
        output.delete();
    }

    @Test public void testFile1()
    {
       // code for test case objective
    }
	@Test public void testFile2()
    {
       // code for test case objective
    }
}
In the above example the chain of execution will be as follows-

Assumption: testFile1() runs before testFile2()– which is not guaranteed.
@BeforeClass public static void Method_Name() {
    // class setup code here
 }
 @AfterClass public static void Method_Name()
 {
    // class cleanup code here
 }
If we want to execute multiple tests in a specified order, it can be done by combining all the tests in one place. This place is called as the test suites. More details on how to execute test suites and how it is used in JUnit will be covered in this tutorial.
JUnit provides a tool for execution of your test cases.
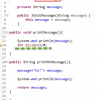
public class Test {
			public static void main(String[] args) {
       		Result result = JUnitCore.runClasses(CreateAndSetName.class);
			for (Failure failure : result.getFailures()) {
         		System.out.println(failure.toString());
      }
      System.out.println(result.wasSuccessful());
   }
}
In above code "result" object is processed to get failures and successful outcomes of test cases we are executing.
Fair knowledge of SDLC, java programming, and basics of software testing process helps in understanding JUnit program.
Let's understand Unit Testing using a live example. We need to create a test class with a test method annotated with @Test as given below:
MyFirstClassTest.java
package gtupapers.JUnit;

import static org.JUnit.Assert.*;

import org.JUnit.Test;

public class MyFirstClassTest {

    @Test
    public void myFirstMethod(){
        String str= "JUnit is working fine";
        assertEquals("JUnit is working fine",str);
    }
}
TestRunner.java
To execute our test method (above) ,we need to create a test runner. In the test runner we have to add test class as a parameter in JUnitCore's runclasses() method . It will return the test result, based on whether the test is passed or failed.
For more details on this see the code below :
package gtupapers.JUnit;

import org.JUnit.runner.JUnitCore;
import org.JUnit.runner.Result;
import org.JUnit.runner.notification.Failure;

public class TestRunner {
			public static void main(String[] args) {
            Result result = JUnitCore.runClasses(MyFirstClassTest.class);
			for (Failure failure : result.getFailures()) {
              System.out.println(failure.toString());
      }
      System.out.println("Result=="+result.wasSuccessful());
   }
}
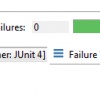
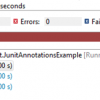
Output
Once TestRunner.java executes our test methods we get output as failed or passed. Please find below output explanation:

Summary:
What is Parameterized Test in Junit? Parameterized test is to execute the same test over and over...
Installing Junit is a 6 part process. It is explained in detailed below- PART 1) Install Java...
Both Testng and Junit are Testing framework used for Unit Testing . TestNG is similar to JUnit....
JUnit provides the facility to trace the exception and also to check whether the code is throwing...
Sometimes you may require not to execute a method/code or Test Case because coding is not done...
What is JUnit Annotations? JUNIT ANNOTATIONS is a special form of syntactic meta-data that can be...