Node-js
Node.js Unit Testing Tutorial with Jasmine
Testing is a key element to any application. For Node.js, the framework available for Testing is...
A module in Node.js is a logical encapsulation of code in a single unit. It's always a good programming practice to always segregate code in such a way that makes it more manageable and maintainable for future purposes. That's where modules in Node.js comes in action.
Since each module is an independent entity with its own encapsulated functionality, it can be managed as a separate unit of work.
In this tutorial, you will learn-
As stated earlier, modules in Node js are a way of encapsulating code in a separate logical unit. There are many readymade modules available in the market which can be used within Node js.
Below are some of the popular modules which are used in a Node js application
In order to use modules in a Node.js application, they first need to be installed using the Node package manager.
The below command line shows how a module "express" can be installed.
npm install express

Let's look at an example of how we can use the "require" keyword. The below "gtupapers" code example shows how to use the require function

var express=require('express');
var app=express();
app.set('view engine','jade');
app.get('/',function(req,res)
{
});
var server=app.listen(3000,function()
{
});
Note:-(Just for the reader's understanding; a templating engine is an approach for injecting values in an application by picking up data from data files. This concept is pretty famous in Angular JS wherein the curly braces {{ key }} is used to substitutes values in the web page. The word 'key' in the curly braces basically denotes the variable which will be substituted by a value when the page is displayed.)
Node.js has the ability to create custom modules and allows you to include those custom modules in your Node.js application.
Let's look at a simple example of how we can create our own module and include that module in our main application file. Our module will just do a simple task of adding two numbers.
Let's follow the below steps to see how we can create modules and include them in our application.
Step 1) Create a file called "Addition.js" and include the below code. This file will contain the logic for your module.
Below is the code which would go into this file;

var exports=module.exports={};
exports.AddNumber=function(a,b)
{
return a+b;
};
Now that we have created our custom module which has the functionality of adding 2 numbers. It's now time to create an application, which will call this module.
In the next step, we will actually see how to create the application which will call our custom module.
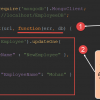
Step 2) Create a file called "app.js," which is your main application file and add the below code

var Addition=require('./Addition.js');
console.log(Addition.AddNumber(1,2));

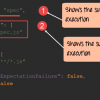
Output:
Note: - We are not using the "Node package manager" as of yet to install our Addition.js module. This is because the module is already part of our project on the local machine. The Node package manager comes in the picture when you publish a module on the internet, which we see in the subsequent topic.
When creating modules, it is also possible to extend or inherit one module from another.
In modern-day programming, it's quite common to build a library of common modules and then extend the functionality of these common modules if required.
Let's look at an example of how we can extend modules in Node.js.
Step 1) Create the base module.
In our example, create a file called "Tutorial.js" and place the below code.
In this code, we are just creating a function which returns a string to the console. The string returned is "gtupapers Tutorial".

var exports=module.exports={};
exports.tutorial=function()
{
console.log("gtupapers Tutorial")
}
Now that we have created our base module called Tutorial.js. It's now time to create another module which will extend this base module.
We will explore how to do this in the next step.
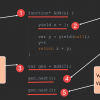
Step 2) Next, we will create our extended module. Create a new file called "NodeTutorial.js" and place the below code in the file.

var Tutor=require('./Tutorial.js');
exports.NodeTutorial=function()
{
console.log("Node Tutorial")
function pTutor()
{
var PTutor=Tutor
PTutor.tutorial();
}
}

Or
var Tutor=require('./Tutorial.js');
exports.NodeTutorial=function()
{
console.log("Node Tutorial")
this.pTutor = function ()
{
var PTutor=Tutor
PTutor.tutorial();
}
}
Note, the following key points about the above code
Step 3) Create your main app.js file, which is your main application file and include the below code.

var localTutor=require('./NodeTutorial.js');
localTutor.NodeTutorial();
localTutor.NodeTutorial.pTutor();

Or use this code
var tut = new localTutor.NodeTutorial();  // Create and save object
tut.pTutor();  // Call function on object
The above code does the following things;
Output:
Since we have executed the above app.js code using Node, we will get the following output in the console.log file
One can publish their own module to their own Github repository.
By publishing your module to a central location, you are then not burdened with having to install yourself on every machine that requires it.
Instead, you can use the install command of npm and install your published npm module.
The following steps need to be followed to publish your npm module
Step 1) Create your repository on GitHub (an online code repository management tool). It can be used for hosting your code repositories.
Step 2) You need to tell your local npm installation on who you are. Which means that we need to tell npm who is the author of this module, what is the email id and any company URL, which is available which needs to be associated with this id. All of these details will be added to your npm module when it is published.
The below commands sets the name, email and URL of the author of the npm module.
npm set init.author.name "gtupapers."
npm set init.author.email "This email address is being protected from spambots. You need JavaScript enabled to view it."
npm set init.author.url http://gtupapers.com
Step 3) The next step is to login into npm using the credentials provided in the last step. To login, you need to use the below command
npm login
Step 4) Initialize your package – The next step is to initialize the package to create the package.json file. This can be done by issuing the below command
npm init
When you issue the above command, you will be prompted for some questions. The most important one is the version number for your module.
Step 5) Publish to GitHub – The next step is to publish your source files to GitHub. This can be done by running the below commands.
git add.
git commit -m "Initial release"
git tag v0.0.1
git push origin master --tags
Step 6) Publish your module – The final bit is to publish your module into the npm registry. This is done via the below command.
npm publish
As we have seen, the "Node package manager" has the ability to manage modules, which are required by Node.js applications.
Let's look at some of the functions available in the node package manager for managing modules
Installing packages in global mode – Modules can be installed at the global level, which just basically means that these modules would be available for all Node.js projects on a local machine. The example below shows how to install the "express module" with the global option.
npm install express –global
The global option in the above statement is what allows the modules to be installed at a global level.
Listing all of the global packages installed on a local machine. This can be done by executing the below command in the command prompt
npm list --global
Below is the output which will be shown, if you have previously installed the "express module" on your system.
Here you can see the different modules installed on the local machine.

Installing a specific version of a package – Sometimes there may be a requirement to install just the specific version of a package. Once you know package name and the relevant version that needs to be installed, you can use the npm install command to install that specific version.
The example below shows how to install the module called underscore with a specific version of 1.7.0
npm install underscore@1.7.0
Updating a package version – Sometimes you may have an older version of a package in a system, and you may want to update to the latest one available in the market. To do this, one can use the npm update command. The example below shows how to update the underscore package to the latest version
npm update underscore
Searching for a particular package – To search whether a particular version is available on the local system or not, you can use the search command of npm. The example below will check if the express module is installed on the local machine or not.
npm search express
Uninstalling a package – The same in which you can install a package, you can also uninstall a package. The uninstallation of a package is done with the uninstallation command of npm. The example below shows how to uninstall the express module
npm uninstall express
The "package.json" file is used to hold the metadata about a particular project. This information provides the Node package manager the necessary information to understand how the project should be handled along with its dependencies.
The package.json files contain information such as the project description, the version of the project in a particular distribution, license information, and configuration data.
The package.json file is normally located at the root directory of a Node.js project.
Let's take an example of how the structure of a module looks when it is installed via npm.
The below snapshot shows the file contents of the express module when it is included in your Node.js project. From the snapshot, you can see the package.json file in the express folder.

If you open the package.json file, you will see a lot of information in the file.
Below is a snapshot of a portion of the file. The express@~4.13.1 mentions the version number of the express module being used.

Summary
Testing is a key element to any application. For Node.js, the framework available for Testing is...
In previous tutorials, you would have seen callback functions which are used for Asynchronous...
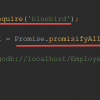
Bluebird is a fully-featured Promise library for JavaScript. The strongest feature of Bluebird is...
In this tutorial, we are going to learn about Generators and their differences with Callbacks What...
What is Node JS? Node.js is a cross-platform runtime library and environment for running...
What is GraphQL? GraphQL is an application layer server-side technology which is developed by...