Node-js
Node.js Generators & Compare with Callbacks
In this tutorial, we are going to learn about Generators and their differences with Callbacks What...
Mostly all modern-day web applications have some sort of data storage system at the backend. For example, if you take the case of a web shopping application, data such as the price of an item would be stored in the database.
The Node js framework can work with databases with both relational (such as Oracle and MS SQL Server) and non-relational databases (such as MongoDB). In this tutorial, we will see how we can use databases from within Node js applications.
In this tutorial, you will learn-
Over the years, NoSQL database such as MongoDB and MySQL have become quite popular as databases for storing data. The ability of these databases to store any type of content and particularly in any type of format is what makes these databases so famous.
Node.js has the ability to work with both MySQL and MongoDB as databases. In order to use either of these databases, you need to download and use the required modules using the Node package manager.
For MySQL, the required module is called "mysql" and for using MongoDB the required module to be installed is "Mongoose."
With these modules, you can perform the following operations in Node.js
For the remaining topics, we will look at how we can work with MongoDB databases within Node.js.
As discussed in the earlier topic, MongoDB is one of the most popular databases used along with Node.js.
During this chapter, we will see
How we can establish connections with a MongoDB database
How we can perform the normal operations of reading data from a database as well as inserting, deleting, and updating records in a MongoDB database.
For the purpose of this chapter, let's assume that we have the below MongoDB data in place.
Database name: EmployeeDB
Collection name: Employee
Documents
{
	{Employeeid : 1, Employee Name : gtupapers},
	{Employeeid : 2, Employee Name : Joe},
	{Employeeid : 3, Employee Name : Martin},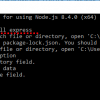
}You need a driver to access Mongo from within a Node application. There are a number of Mongo drivers available, but MongoDB is among the most popular. To install the MongoDB module, run the below command
npm install mongodb

Code Explanation:
If the above code is executed properly, the string "Connected" will be written to the console as shown below.

The below section will show how we can use the driver to fetch all of the documents from our Employee collection in our EmployeeDB database. This is the collection in our MongoDB database, which contains all the employee-related documents. Each document has an object id, Employee name, and employee id to define the values of the document.

var MongoClient = require('mongodb').MongoClient;
var url = 'mongodb://localhost/EmployeeDB';

MongoClient.connect(url, function(err, db) {

    var cursor = db.collection('Employee').find();

    cursor.each(function(err, doc) {

        console.log(doc);

    });
});
Code Explanation:
In the first step, we are creating a cursor (A cursor is a pointer which is used to point to the various records fetched from a database. The cursor is then used to iterate through the different records in the database. Here we are defining a variable name called cursor which will be used to store the pointer to the records fetched from the database. ) which points to the records which are fetched from the MongoDb collection. We also have the facility of specifying the collection 'Employee' from which to fetch the records. The find() function is used to specify that we want to retrieve all of the documents from the MongoDB collection.
We are now iterating through our cursor and for each document in the cursor we are going to execute a function.
Our function is simply going to print the contents of each document to the console.
Note: - It is also possible to fetch a particular record from a database. This can be done by specifying the search condition in the find() function. For example, suppose if you just wanted to fetch the record which has the employee name as gtupapers, then this statement can be written as follows
var cursor=db.collection('Employee').find({EmployeeName: "gtupapers"})If the above code is executed successfully, the following output will be displayed in your console.
Output:

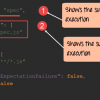
From the output,

var MongoClient = require('mongodb').MongoClient;
var url = 'mongodb://localhost/EmployeeDB';

MongoClient.connect(url, function(err, db) {

    db.collection('Employee').insertOne({
        Employeeid: 4,
        EmployeeName: "NewEmployee"
    });
});
Code Explanation:
If you now check the contents of your MongoDB database, you will find the record with Employeeid of 4 and EmployeeName of "NewEmployee" inserted into the Employee collection.
Note: The console will not show any output because the record is being inserted in the database and no output can be shown here.
To check that the data has been properly inserted in the database, you need to execute the following commands in MongoDB
The first statement ensures that you are connected to the EmployeeDb database. The second statement searches for the record which has the employee id of 4.

var MongoClient = require('mongodb').MongoClient;
var url = 'mongodb://localhost/EmployeeDB';

MongoClient.connect(url, function(err, db) {

    db.collection('Employee').updateOne({
        "EmployeeName": "NewEmployee"
    }, {
        $set: {
            "EmployeeName": "Mohan"
        }
    });
});
Code Explanation:
If you now check the contents of your MongoDB database, you will find the record with Employeeid of 4 and EmployeeName of "Mohan" updated in the Employee collection.
To check that the data has been properly updated in the database, you need to execute the following commands in MongoDB
The first statement ensures that you are connected to the EmployeeDb database. The second statement searches for the record which has the employee id of 4.

var MongoClient = require('mongodb').MongoClient;
var url = 'mongodb://localhost/EmployeeDB';

MongoClient.connect(url, function(err, db) {

    db.collection('Employee').deleteOne(

        {
            "EmployeeName": "Mohan"
        }

    );
});
Code Explanation:
If you now check the contents of your MongoDB database, you will find the record with Employeeid of 4 and EmployeeName of "Mohan" deleted from the Employee collection.
To check that the data has been properly updated in the database, you need to execute the following commands in MongoDB
The first statement ensures that you are connected to the EmployeeDb database. The second statement searches and display all of the records in the employee collection. Here you can see if the record has been deleted or not.
Building an application with a combination of both using express and MongoDB is quite common nowadays.
When working with JavaScript web based applications, one will normally here of the term MEAN stack.
Hence, it's always good to understand how Node.js and MongoDB work together to deliver applications which interact with backend databases.
Let's look at a simple example of how we can use "express" and "MongoDB" together. Our example will make use of the same Employee collection in the MongoDB EmployeeDB database.
We will now incorporate Express to display the data on our web page when it is requested by the user. When our application runs on Node.js, one might need to browse to the URL http://localhost:3000/Employeeid.
When the page is launched, all the employee id in the Employee collection will be displayed. So let's see the code snippet in sections which will allow us to achieve this.
Step 1) Define all the libraries which need to be used in our application, which in our case is both the MongoDB and express library.

Code Explanation:
Step 2) In this step, we are now going to get all of the records in our 'Employee' collection and work with them accordingly.

Code Explanation:
Step 3) In this step, we are going to send our output to the web page and make our application listen on a particular port.

Code Explanation:
Output:

From the output,
Here is the code for your reference
var express = require('express');
var app = express();
var MongoClient = require('mongodb').MongoClient;
var url = 'mongodb://localhost/EmployeeDB';
var str = "";

app.route('/Employeeid').get(function(req, res)

    {
        MongoClient.connect(url, function(err, db) {
            var cursor = db.collection('Employee').find();
            //noinspection JSDeprecatedSymbols
            cursor.each(function(err, item) {

                if (item != null) {
                    str = str + "    Employee id  " + item.Employeeid + "</br>";
                }
            });
            res.send(str);
            db.close();
        });
    });

var server = app.listen(3000, function() {});
Note: cursor.each maybe deprecated based on version of your MongoDB driver. You can append //noinspection JSDeprecatedSymbols before cursor.each to circumvent the issue. Alternatively, you can use forEach. Below is the sample code using forEach
var express = require('express');
var app = express();
var MongoClient = require('mongodb').MongoClient;
var url = 'mongodb://localhost/EmployeeDB';
var str = "";

app.route('/Employeeid').get(function(req, res) {
   MongoClient.connect(url, function(err, db) {
       var collection = db.collection('Employee');
       var cursor = collection.find({});
       str = "";
       cursor.forEach(function(item) {
           if (item != null) {
                   str = str + "    Employee id  " + item.Employeeid + "</br>";
           }
       }, function(err) {
           res.send(err);
           db.close();
          }
       );
   });
});
var server = app.listen(8080, function() {});
Summary
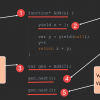
In this tutorial, we are going to learn about Generators and their differences with Callbacks What...
A module in Node.js is a logical encapsulation of code in a single unit. It's always a good...
Testing is a key element to any application. For Node.js, the framework available for Testing is...
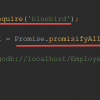
Bluebird is a fully-featured Promise library for JavaScript. The strongest feature of Bluebird is...
What is Node.js? Node.js is a server-side platform built on Google Chrome's JavaScript Engine. It uses a...
What is GraphQL? GraphQL is an application layer server-side technology which is developed by...