Selenium
XSLT Report in Selenium Webdriver
XSLT Report The XSLT Report in the Selenium framework is a very important feature that is used to...
In this tutorial, we will learn, Store commands, Echo commands, Alerts and Popup handling.
To store variables in Selenium IDE, we use the "store" command. The illustration below stores the value "tutorial" to a variable named "myVariable."

To access the variable, simply enclose it in a ${ ... } symbol. For example, to enter the value of "myVariable" onto the "userName" textbox of Mercury Tours, enter ${myVariable} in the Value field.

This command stores either "true" or "false" depending on the presence of the specified element. The script below stores the Boolean value "true" to "var1" and "false" to "var2". To verify, we will use the "echo" command to display the values of var1 and var2. The Base URL for the illustration below was set to Mercury Tours homepage.

This command is used to store the inner text of an element onto a variable. The illustration below stores the inner text of the tag in Facebook onto a variable named 'textVar.'

Since it is the only element in the page, it is safe to use 'css=h1' as our target. The image below shows that Selenium IDE was able to save the string "Sign Up" in the 'textVar' variable by printing its value correctly.

Alerts are probably the simplest form of pop-up windows. The most common Selenium IDE commands used in handling alerts are the following:
| assertAlert assertNotAlert | retrieves the message of the alert and asserts it to a string value that you specified |
| assertAlertPresent assertAlertNotPresent | asserts if an Alert is present or not |
| storeAlert | retrieves the alert message and stores it in a variable that you will specify |
| storeAlertPresent | returns TRUE if an alert is present; FALSE if otherwise |
| verifyAlert verifyNotAlert | retrieves the message of the alert and verifies if it is equal to the string value that you specified |
| verifyAlertPresent verifyAlertNotPresent | verifies if an Alert is present or not |
Remember these two things when working with alerts:
In this example, we will use the storeAlert command to show that even though Selenium IDE did not show the actual alert, it was still able to retrieve its message.
Step 1. In Selenium IDE, set the Base URL to http://jsbin.com. & the full url is: http://jsbin.com/usidix
Step 2. Create the script as shown below.

Step 3. Execute the script and do not expect that you will be able to see the actual alert.

Confirmations are popups that give you an OK and a CANCEL button, as opposed to alerts which give you only the OK button. The commands you can use in handling confirmations are similar to those in handling alerts.
However, these are the additional commands that you need to use to instruct Selenium which option to choose, whether the OK or the CANCEL button.
You should use these commands before a command that triggers the confirmation box so that Selenium IDE will know beforehand which option to choose. Again, you will not be able to see the actual confirmation box during script execution.
Let us test a webpage that has a button that was coded to show whether the user had pressed the OK or the CANCEL button.
Step 1. In Selenium IDE, set the Base URL to http://jsbin.com & the full url is: http://jsbin.com/enifaf
Step 2. Create the script as shown below. This time, we will press the OK button first.

Step 3. Execute the script and notice that you do not see the actual confirmation, but the webpage was able to indicate which button Selenium IDE had pressed.

Step 4. Replace the "chooseOkOnNextConfirmation" command with "chooseCancelOnNextConfirmation" and execute the script again.

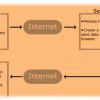
If you happen to click on a link that launches a separate window, you must first instruct Selenium IDE to select that window first before you could access the elements within it. To do this, you will use the window's title as its locator.
We use the selectWindow command in switching between windows.
We will use a link http://jsbin.com/ocinaj/1 whose title is "First Window." The "here" hyperlink found on that page will open Facebook in a new window, after which we shall instruct Selenium IDE to do the following:

Step 1. Set the Base URL to http://jsbin.com.
Step 2. Create the script as shown below.

We need the "pause" command to wait for the newly launched window to load before we could access its title.
Step 3. Execute the script. Notice that the Test Case passed, meaning that we were able to switch between windows and verify their titles successfully.

Always remember that setting selectWindow's target to "null" will automatically select the parent window (in this case, the window where the element "link=here" is found)
Note: Facebook has changed the title since the creation of Tutorials. Please modify the code accordingly
XSLT Report The XSLT Report in the Selenium framework is a very important feature that is used to...
In this tutorial, you will learn how to integrate Cucumber with Selenium Webdriver. What is...
In this tutorial, you will learn- Create a Selenium Project Convert and Execute Selenium Project to...
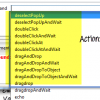
To understand extensions, lets first understand the three pillars of selenium IDE Action: What...
What is Apache Ant? While creating a complete software product, one needs to take care different third...
What is Ajax? AJAX stands for Asynchronous JavaScript & XML, and it allows the Web page to...