SAP - FI

Accounts Payable in SAP FI
Accounts Payable is a submodule of SAP FI used to manage and record Accounting data for all the...
The Support Package Stack is a list of ABAP and Java Support Packages for all software components (SC) included in SAP NetWeaver. It is used to bring each Software Component of SAP NetWeaver to a defined Support Pack (SP) level.
Support Package Stack, commonly known as STACK bundles all required components or individual patches that are already tested together and recommended applying as SPS instead of individual patch (until and unless you face some problem which requires certain components to be patched).
Go to https://service.sap.com/sp-stacks/, select your NW version to check the current SPS level and other details.
Support Package Stacks have a release number, and a Stack number, Example, SAP NetWeaver '04 Support Package Stack 11.
Each software component has a separate sequence of Support Packages. The following list contains the technical names of a number of components and the notation for their Support Packages:
Step 1: Download Support Packs
Support Packages are available in SAP Support Portal, under service.sap.com/patches.
Step 2: Loading Support Packages:
To load support packages we have two options:-
From Application Server
sapcar –xvf <support package name>

Step 5: Importing Queue.
Once you a define a Queue (Step 4) while selecting a particular component (for which we want to upgrade support pack), we need to do 'Import queue' to start importing/applying that particular selected support pack (as per the standard SAP process).
Choose Support Package --> Import Queue
To become familiar with known problems and issues, always read the note mentioned in above screenshot.
The support package import has been started
Step 6: Confirming Queue:
Confirm that the queue has been imported successfully into your system. This allows you to import Support Packages in the future. You will not be able to import Support Packages further, if you do not confirm the queue.
Once Queue has been imported, SPAM status becomes YELLOW
Confirm successful import of the Support Packages into your system by choosing Support Package à Confirm.
Go to-->Import log-->Queue
It also includes information about the point at which a phase was stopped, as well as detailed error information.
To display the logs for the current queue Go to-->Action log
Accounts Payable is a submodule of SAP FI used to manage and record Accounting data for all the...
Download PDF 1) What is SAP CRM? SAP CRM (Customer Relationship Management) is a software tool...
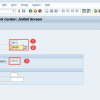
Work center is an organization unit where manufacturing activities are performed. In other words,...
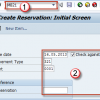
Reservations are system documents that show a requirement for a certain amount of good for...
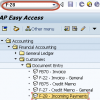
In this tutorial, we will learn Incoming & Outgoing Partial Payments Posting using Residual Method...
In this tutorial we will go throught the process of copying an existing material master data into...