PHP

PHP MySQLi Functions: mysqli_query, mysqli_connect, mysqli_fetch_array
PHP has a rich collection of built in functions for manipulating MySQL databases. In this...
XAMPP is an open source cross platform web server, MySQL database engine, and PHP and Perl package. It is compiled and maintained by apache. The acronym XAMPP stands for;
In this tutorial, you will learn-
We look into step by step process to install XAMPP for Windows. For Other Operating Systems, installation steps are similar.
Note a service is a long-running program in windows that does not require user intervention. Services can be set to run automatically whenever the windows operating system is started. For you to use Apache and MySQL, they are supposed to be running in the background. Installing them as services runs both Apache and MySQL automatically in the background whenever you power up your computer. If you have not installed Apache and MySQL as services, then you have to manually start them every time that you want to use them. You will have to do this from the XAMPP control panel.PHP and
Before we test our XAMPP installation, let’s first look at the basic directories that we will be working with.
This tutorial assumes that you have installed XAMPP on drive C in Windows using the steps mentioned above. The following is a list of the basic directories that you are supposed to be aware of.
By default, the Apache web server runs on port 80. If port 80 is taken by another web server, you can use a different port number. For this tutorial we will assume we are using port 80. Note,If you use SKYPE , it uses the same port. Close Skype if you want to use Apache on port 80
The control panel is used to manage programs installed via XAMPP. To open the XAMPP control panel,
1) This section lists the installed services, modules and the process IDs PID(s). A green tick means the module has been installed as a service. The red mark means it has not been installed as a service. To install a service, click on the red mark. If the button shows a green tick and you click on it, the control panel will ask you if you want to uninstall the system.
2) This section shows Port(s) associated with the modules. The actions section is for;
3) This section contains useful utilities such as Netsat, windows services short cuts etc.
4) This section displays status information on the modules. The control panel can be used to;
Let’s now look at the basic configurations required before we start using our XAMPP installation for developing PHP powered web sites. Type the URL http://localhost/xampp/ in your favorite browser. For this tutorial, we will be using Firefox as our web browser.
If you are able to see the above screen then you have installed XAMPP successfully. The panel on the left hand side contains links to useful information such as;
The PHP version shipped with XAMPP 1.8.0 is PHP 5.4.4
A PHP IDE is a program that allows you to easily write PHP codes. PHP IDEs are often equipped with syntax highlighting features and in some cases autocomplete features too. This means that if you write a PHP keyword that is known by the PHP interpreter, then the keyword will be highlighted a different color from the one used for regular statements. The autocomplete features automatically pops up known PHP keywords as you type them. Notepad can also be used to write and editor PHP codes. The disadvantage of using an editor such as Notepad is that debugging the scripts becomes difficult because it is not easy to spot errors such as misspelt keywords, unclosed braces etc. an IDE will highlight the statements with errors so it’s easy for you to spot them. The table shown below shows 5 popular PHP editors
| Editor | License | Cross Platform | Brief description |
|---|---|---|---|
| Netbeans IDE | Open Source | Yes |
|
| Dreamweaver | Commercial | Yes |
|
| Zend studio | Commercial | Yes |
|
| PHP Eclipse | Open Source | Yes |
|
| Notepad ++ | Freeware | Windows only |
|
Netbeans IDE PHP editor As briefly highlighted in the above table, Netbeans IDE has powerful features that enhance the productive of PHP coders. The IDE can be freely downloaded from the https://netbeans.org/downloads/index.html
The current version of the Netbeans IDE as of this writing is version 7.3
After you have successfully installed the Netbeans IDE PHP editor, run the program just like any other windows program. The window shown below appears
1. Project explorer – this panel is used to display all the opened projects. The projects are listed in a tree view.
2. Shortcuts tool bar – this toolbar contains shortcuts to frequently performed tasks such as creating a new project, opening an existing project, undo and redo actions etc.
3. Startup page – this page contains 3 tabs namely- Learn & Discover, My Netbeans and What’s New.
4. Output window – it is used to display output from programs such as Java console applications. It is also used to display log and debug information. The screenshot below shows the IDE with a project open.
Note the above settings will be set for you by default. You don’t have to change anything unless you are an expert
<?php
echo "Hello World!";
?>
PHP has a rich collection of built in functions for manipulating MySQL databases. In this...
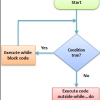
What is a control structure? Code execution can be grouped into categories as shown below...
A Loop is an Iterative Control Structure that involves executing the same number of code a number...
What is Regular expression in PHP? PHP Regular Expression also known as regex are powerful pattern...
What is XML? XML is the acronym for Extensible Markup Language. XML is used to structure, store...
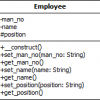
What is OOPs? Object Oriented is an approach to software development that models application...